Delightful Easter Bunny Dirt Cake: A Festive Treat You’ll Love
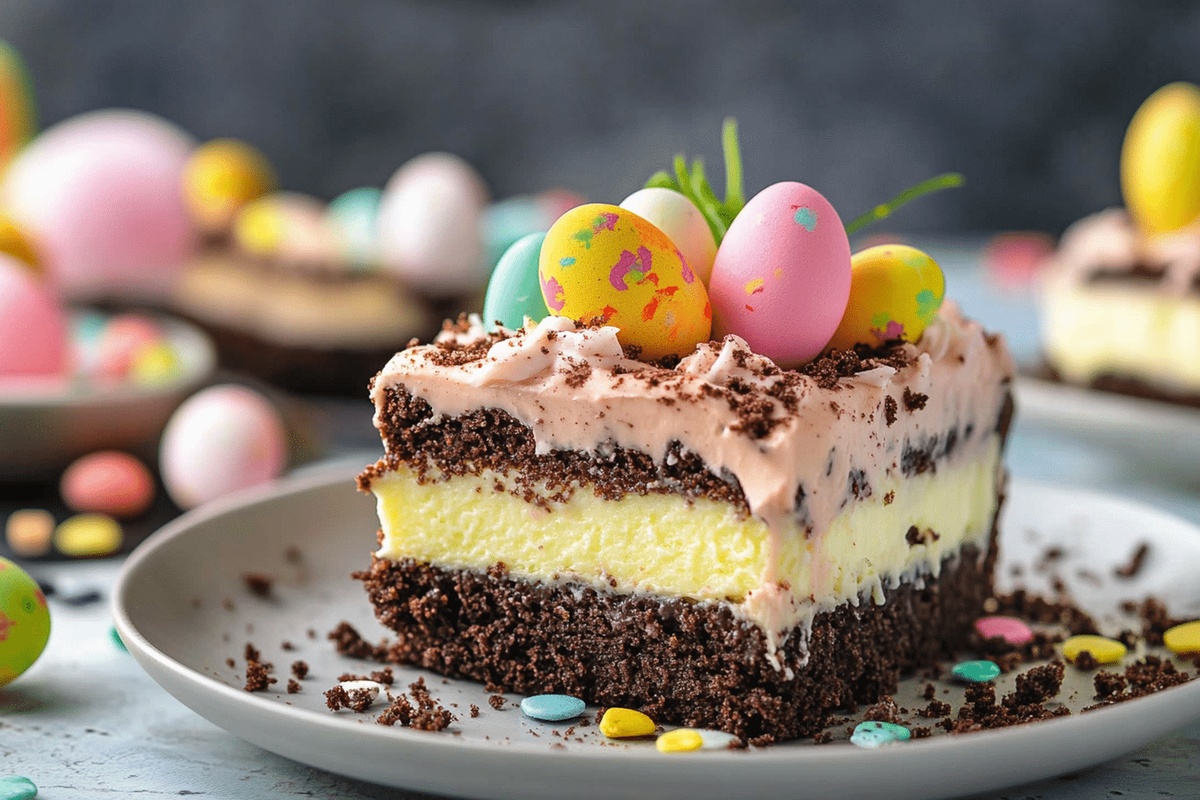
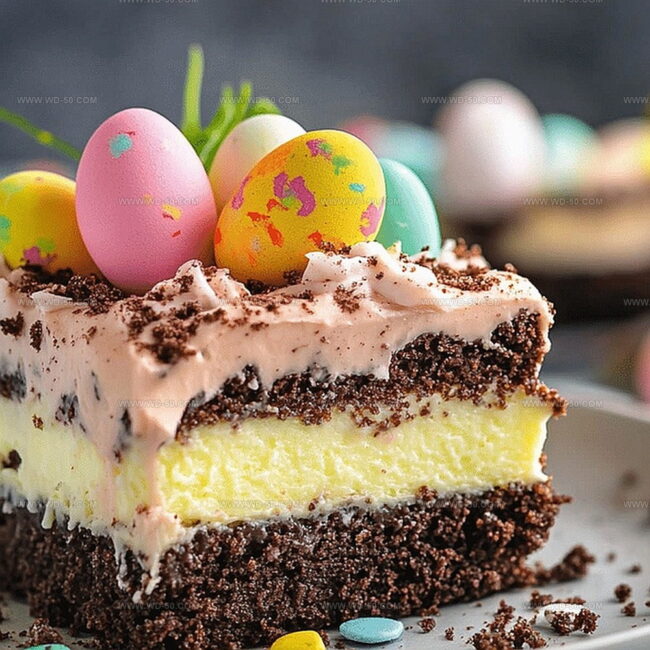
The Easter Bunny Dirt Cake is a fun dessert that brings the joy of springtime to your table.
This sweet treat mixes creamy pudding with crushed cookies and festive toppings, making it a charming addition to any celebration.
Families and kids look forward to enjoying this colorful dessert during their holiday meals.
Its mix of smooth textures and chocolatey flavors is sure to please anyone with a sweet tooth.
Toppings like candy eggs, chocolate bunnies, and bright sprinkles turn this cake into a joyful centerpiece for Easter feasts.
The creative design of the Easter Bunny Dirt Cake makes it an unforgettable and tasty part of holiday traditions that everyone loves.
Why Easter Bunny Dirt Cake Is So Fun
What To Grab For Easter Bunny Dirt Cake
Crust Ingredients:Pudding and Cream Layer Ingredients:Decorative and Topping Ingredients:Simple Steps For Easter Bunny Dirt Cake

Step 1: Create Oreo Crust
Grab a food processor and transform Oreos into fine crumbs. Drizzle melted butter over the crumbs and mix thoroughly. Press the buttery mixture into a 9×13-inch pan, creating a compact base. Slide the pan into the refrigerator to set.
Step 2: Whip Up Pudding Layer
In a mixing bowl, combine milk and instant pudding. Whisk energetically until the mixture becomes silky smooth. Pop the bowl into the refrigerator and let it chill for 10-15 minutes until it thickens.
Step 3: Craft Fluffy Cream Topping
Prepare cream cheese, beating until completely smooth. Take a mixing bowl and whisk attachment, then freeze them for 5-10 minutes. Whip heavy cream on medium-high speed until soft peaks emerge. Add:Beat the mixture until stiff peaks form and the cream stands tall.
Step 4: Build Your Dirt Cake
Grab a Ziploc bag and roughly crush 12 Oreos. Grind another 12 Oreos into fine crumbs for topping. Gently fold the whipped cream mixture and crushed Oreos into the pudding. Spread this delightful mixture over the Oreo crust. Sprinkle the fine Oreo crumbs on top to create a dirt-like appearance.
Step 5: Chill and Decorate
Refrigerate the cake for at least 3 hours to let all the flavors meld together. When ready to serve, add festive decorations like:Tips For Making Easter Bunny Dirt Cake
Store Easter Bunny Dirt Cake Without A Mess
Tasty Matches For Easter Bunny Dirt Cake
Easter Bunny Dirt Cake Fun Mix Ideas
Easter Bunny Dirt Cake FAQ Answers
No, the crust requires fine crumbs using a food processor, while the topping involves roughly crushing 12 Oreos in a Ziploc bag and finely grinding another 12 Oreos for the top layer.
While Oreos work best for the classic dirt cake texture and flavor, you could experiment with chocolate graham crackers or chocolate sandwich cookies as an alternative.
Yes, chilling the bowl and whisk attachment for 5-10 minutes helps create better volume and stability when whipping the cream, ensuring a fluffier texture.
Whip the cream until soft peaks form first, then add powdered sugar, vanilla, and cream cheese. Continue beating until stiff peaks form, which means the cream stands up straight when the whisk is lifted.
Print
Delightful Easter Bunny Dirt Cake Recipe
- Total Time: 20 minutes
- Yield: 12 1x
Description
Chocolate-lovers rejoice with this playful Easter Bunny Dirt Cake, a whimsical dessert that blends childhood nostalgia and delightful textures. Rich chocolate pudding, crushed cookies, and adorable bunny decorations create a festive treat you’ll savor with pure delight.
Ingredients
Main Ingredients:
- 2 13 ounces (369 grams) packages oreo cookies (crushed, with filling)
- 2 3.4 ounces (96 grams) boxes instant chocolate pudding mix
- 3 cups milk (any variety)
- 8 ounces (226 grams) full-fat cream cheese (room temperature)
- 1 ½ cups heavy whipping cream
Sweeteners and Flavor Enhancers:
- ½ cup butter (melted, salted or unsalted)
- ½ cup powdered sugar
- 2 teaspoons vanilla extract
Decorative Ingredients:
- Candy eggs
- Marshmallow peeps
- Shredded coconut
- Sprinkles
Instructions
- Transform Oreo cookies into fine, delicate crumbs using a food processor, ensuring a uniform texture for the cake’s foundation.
- Incorporate melted butter into the cookie crumbs, creating a cohesive, moist mixture that will form a sturdy base when pressed into a rectangular baking dish.
- Firmly compact the buttery crumb mixture across the entire surface of the pan, then chill in the refrigerator to solidify the crust.
- Whisk milk and instant pudding together vigorously, blending until the mixture achieves a silky, lump-free consistency.
- Allow the pudding to rest and thicken in the refrigerator, developing a rich, creamy texture.
- Thoroughly beat cream cheese until it becomes smooth and free of lumps, preparing it for incorporation into the dessert.
- Prepare the whipping station by thoroughly chilling the mixing bowl and whisk attachment to ensure optimal cream formation.
- Whip heavy cream at a medium-high speed, gradually developing soft, billowy peaks that indicate proper aeration.
- Enhance the whipped cream by gently folding in powdered sugar, vanilla extract, and the prepared cream cheese, continuing to beat until stiff, luxurious peaks form.
- Roughly crush a portion of Oreo cookies within a sealed bag, creating varied texture for the dessert’s middle layer.
- Pulverize additional Oreos into fine, sandy crumbs to be used as the final topping.
- Delicately fold the whipped cream mixture and crushed Oreos into the prepared pudding, creating a harmonious, marbled effect.
- Evenly distribute the combined mixture over the chilled Oreo crust, ensuring complete coverage.
- Generously sprinkle the finely ground Oreo crumbs across the top, creating a realistic “dirt” appearance.
- Refrigerate the dessert for a minimum of three hours, allowing flavors to meld and the texture to set completely.
- Embellish the chilled dessert with pastel candy eggs, marshmallow Peeps, delicate shredded coconut, or festive sprinkles to complete the Easter-themed presentation.
Notes
- Crush Oreos with a rolling pin or food processor to create a fine, even texture for the perfect crust foundation.
- Use softened cream cheese at room temperature to ensure a smooth, lump-free mixture that blends seamlessly with the whipped cream.
- Chill all ingredients and equipment beforehand to help the whipped cream maintain its structure and create a light, airy texture.
- Customize the dessert for dietary needs by using gl
- Prep Time: 20 minutes
- Cook Time: 0 minutes
- Category: Desserts, Snacks
- Method: None
- Cuisine: American
Nutrition
- Serving Size: 12
- Calories: 395
- Sugar: 25 g
- Sodium: 300 mg
- Fat: 24 g
- Saturated Fat: 14 g
- Unsaturated Fat: 10 g
- Trans Fat: 0 g
- Carbohydrates: 39 g
- Fiber: 2 g
- Protein: 6 g
- Cholesterol: 55 mg
Michael Reynolds
Founder, Head Recipe Developer & Cuisine Specialist
Expertise
Recipe Development and Testing, Modern American and European Cuisines, Food Styling and Photography, Culinary Education and Workshops
Education
Johnson & Wales University
Auguste Escoffier School of Culinary Arts
Michael Reynolds is the founder and head recipe creator at wd-50.com. With over 15 years of experience in the kitchen, he’s spent time working in top restaurants and now focuses on making great food easy for everyone at home.
Michael studied culinary arts at Johnson & Wales University and later trained in pastry at the Auguste Escoffier School. He knows his way around both savory meals and sweet treats.
At wd-50.com, his goal is to help you feel confident in the kitchen, whether you’re trying something new or cooking a favorite dish. He loves using fresh ingredients and simple steps that still bring out big flavors.